
This post will explore two essential components of Access Control for web applications and APIs: Authentication and Authorization. HALOCK Security Labs’ Pen Testing Team has discovered a significant amount of Authentication and Authorization related findings during web application and API penetration testing. While both these concepts are foundational in computing, they are often misunderstood or confused. Although the concepts themselves may seem straightforward, their correct implementation can be complex, particularly as the sophistication of applications and APIs continues to grow.
Key Terminology
Before delving into the details, it is important to define a few key terms:
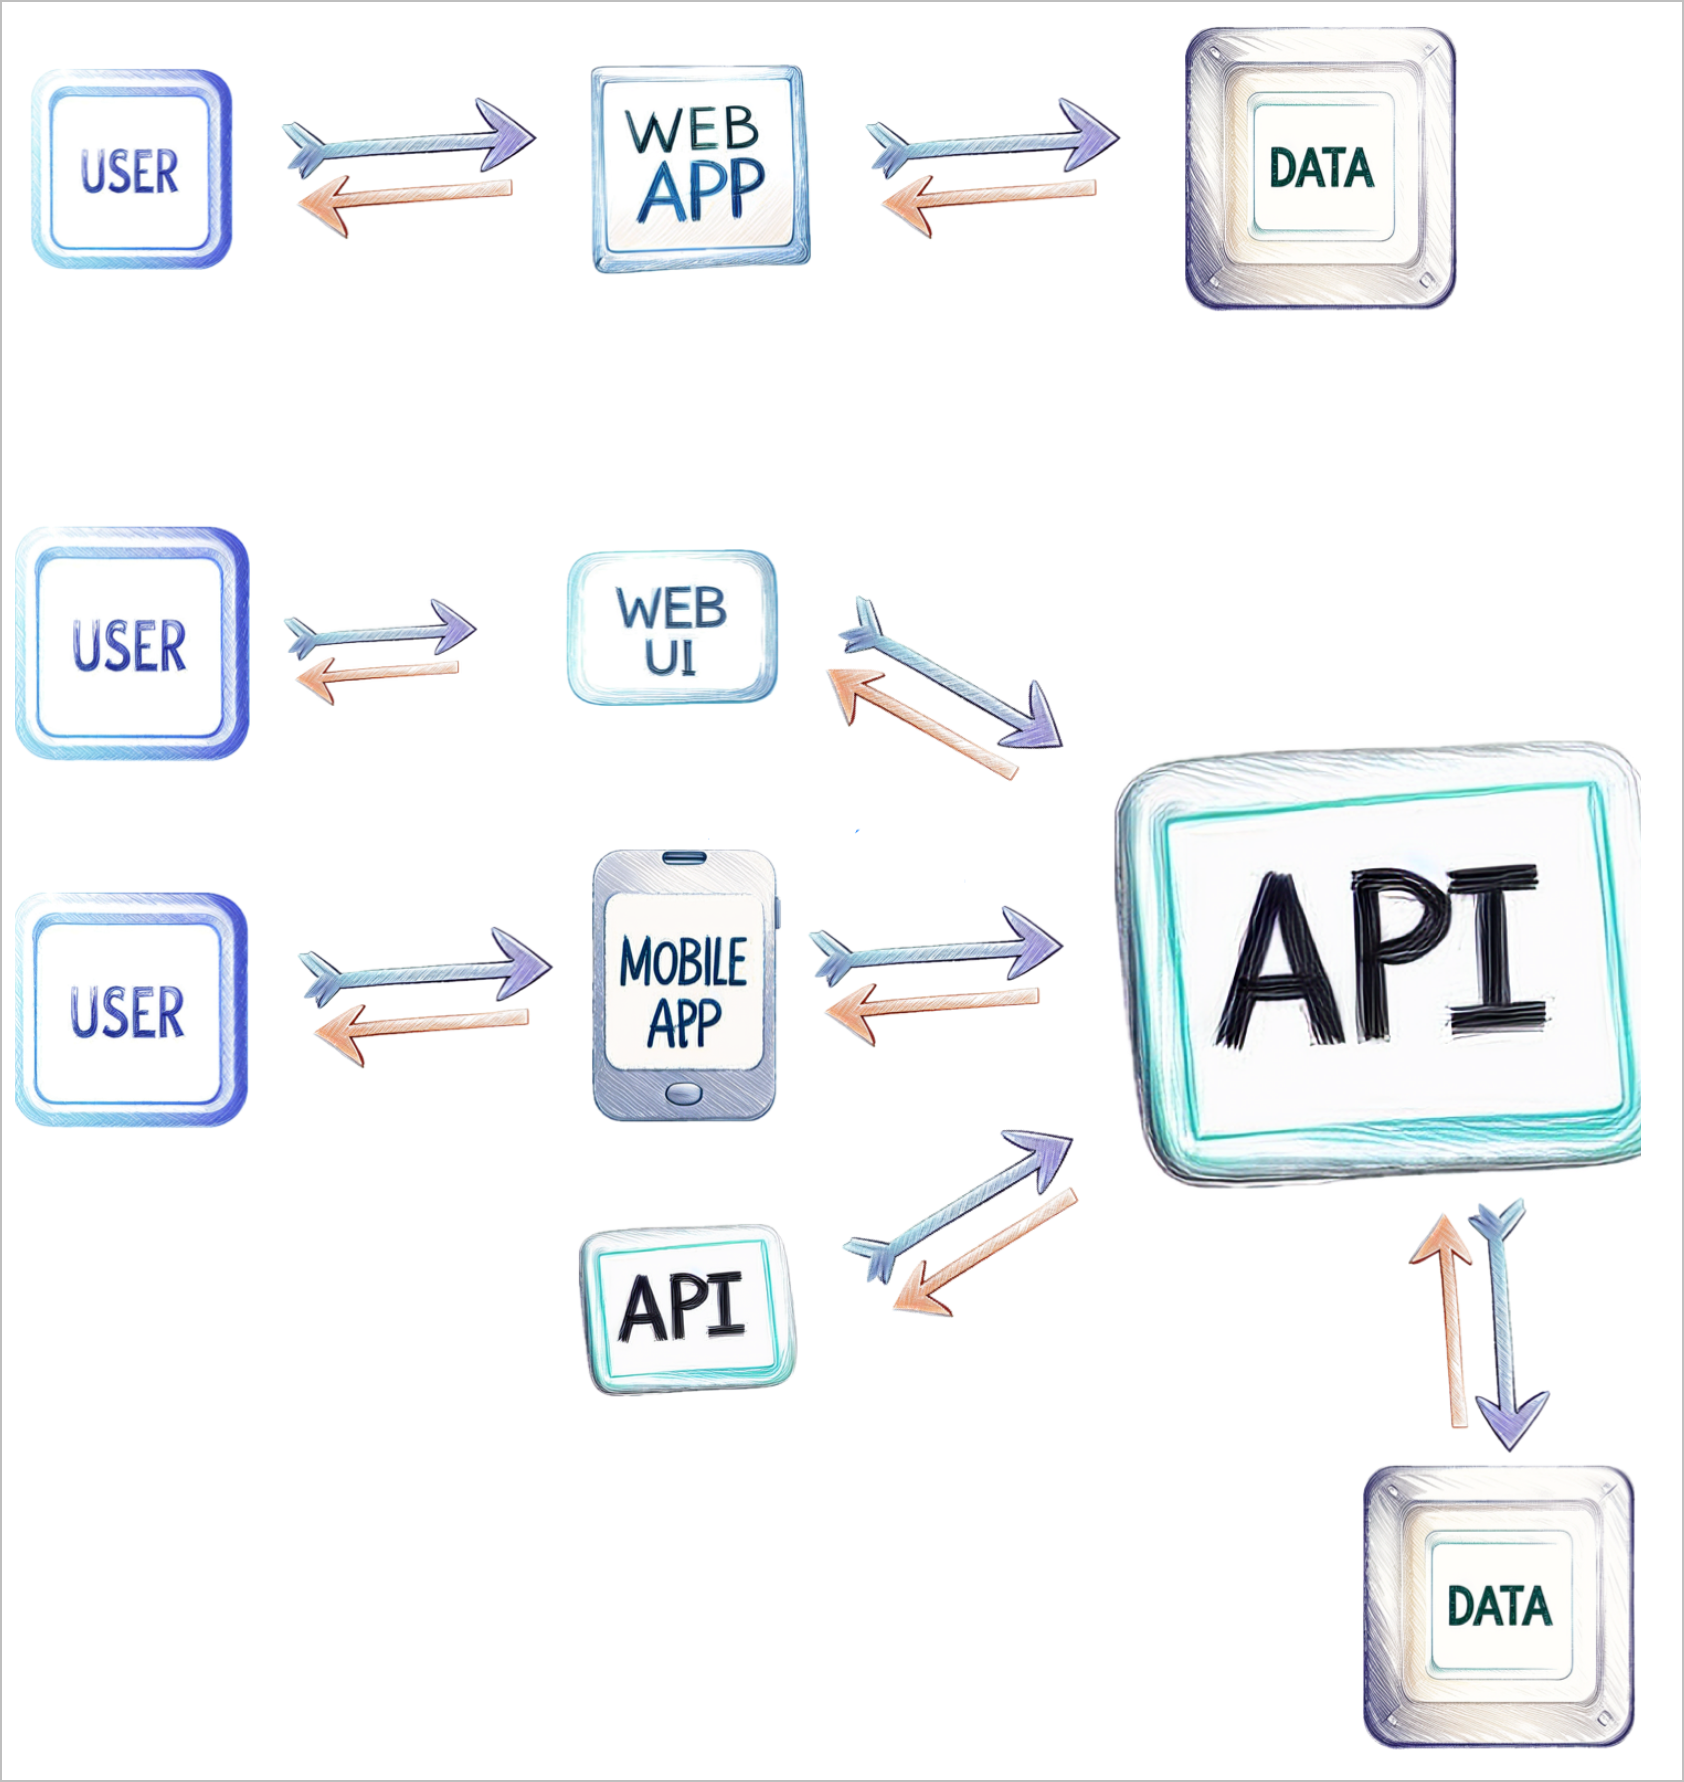
- Web Application: A web application refers to a website or web-based service that a user interacts with via a web browser. It may or may not utilize an Application Programming Interface (API).
- API: An API is a set of protocols that allows different software applications to communicate with each other. APIs are often used when users interact with mobile applications or other client applications. Unlike web applications, APIs are not typically accessed directly by end-users; instead, users interact with a front-end (such as a mobile app or website), which communicates with the API behind the scenes.
- ***For the purposes of this post, the term “application” will be used broadly to refer to both APIs and non-API web applications. ***
Figure: Common Web Application / API Scenarios
Authentication: Verifying Identity
Authentication is the process of verifying the identity of a user or client. In essence, it is about confirming that the user is who they claim to be before granting access to the system.
The most common method of authentication involves the use of username and password. Upon attempting to access the application, users are prompted to provide their credentials. In some cases, a third-party Single Sign-On (SSO) solution may handle the authentication process, allowing users to log in using credentials from another service.
Once the user’s identity is validated, the application typically issues a session token (such as a session cookie or JSON Web Token (JWT). This token serves to maintain the user’s authenticated session, eliminating the need to re-enter credentials for each subsequent request. It’s also important to ensure these tokens are configured to expire after a specific time period, user inactivity, or when the user opts to log out.
Example: Session Cookies and JWTs
The authentication process typically works as follows with session cookies or JWTs:
- Session Cookies: After successful login, the server responds with a session cookie (e.g., “session”). This cookie is stored in the user’s browser and sent with each subsequent request, allowing the application to verify that the request is coming from an authenticated user.
- JWTs: After successful login, the server sends a JWT, a long alphanumeric string containing the user’s authentication data. This token is included in the headers of subsequent requests to authenticate the user.
Though this process is referred to as Authentication, it is important to note that the token used for authentication is often included as part of the “Authorization header” in requests, which can cause confusion, as Authorization is a separate process we will discuss shortly.
Figure: Authentication with Session Cookie Returned
The figure below shows an example of session cookies and a JWT in action – as these terms are commonly used when discussing access control. These images are from a proxy application called BurpSuite and show real traffic from a browser to an application.
First, the username and password are submitted in a request as shown in the yellow highlight on the left side. The credentials are validated, and the application responds by setting a session cookie called “session” as seen on right side of the image. This session cookie is then submitted along with subsequent requests that the application uses to confirm the user’s authentication.
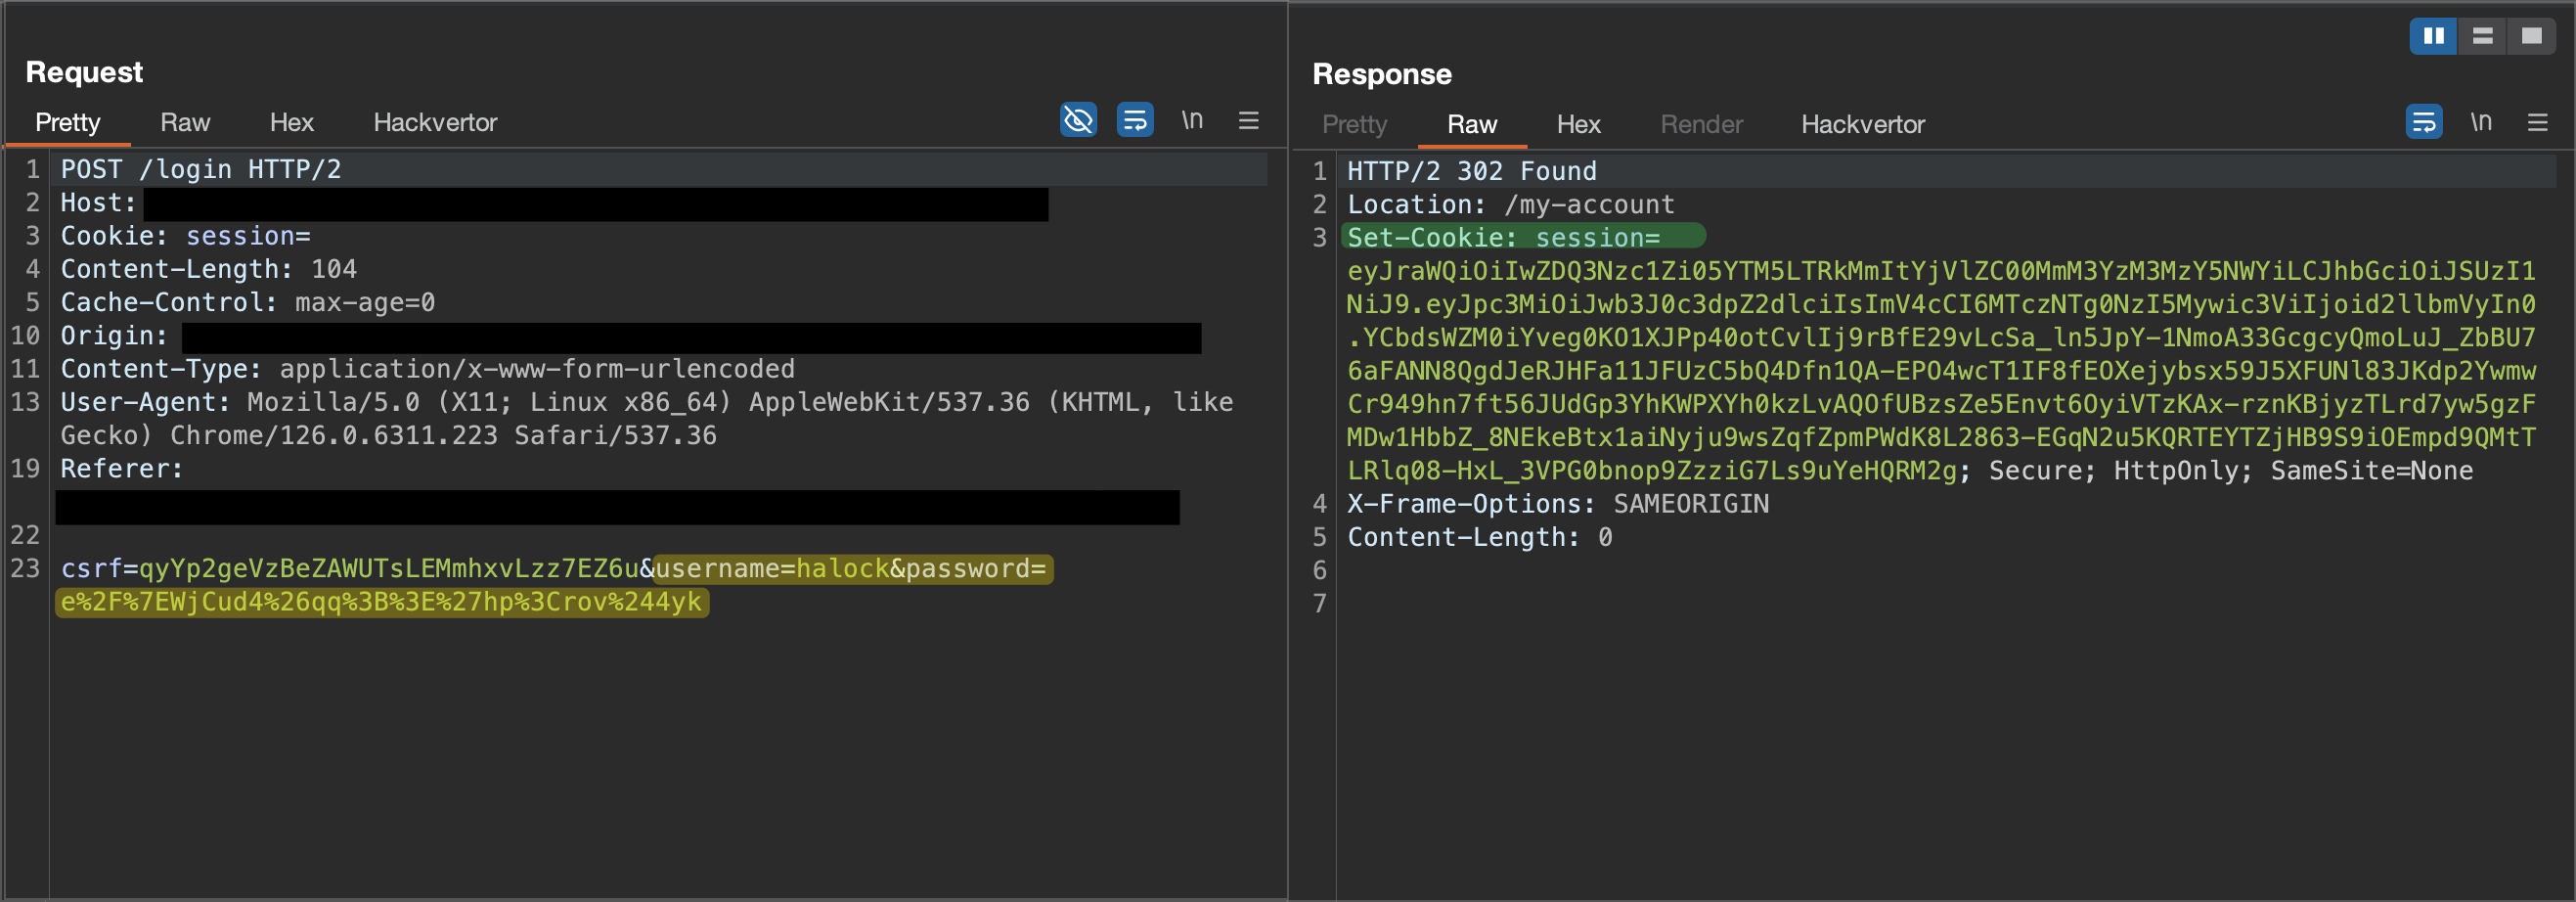
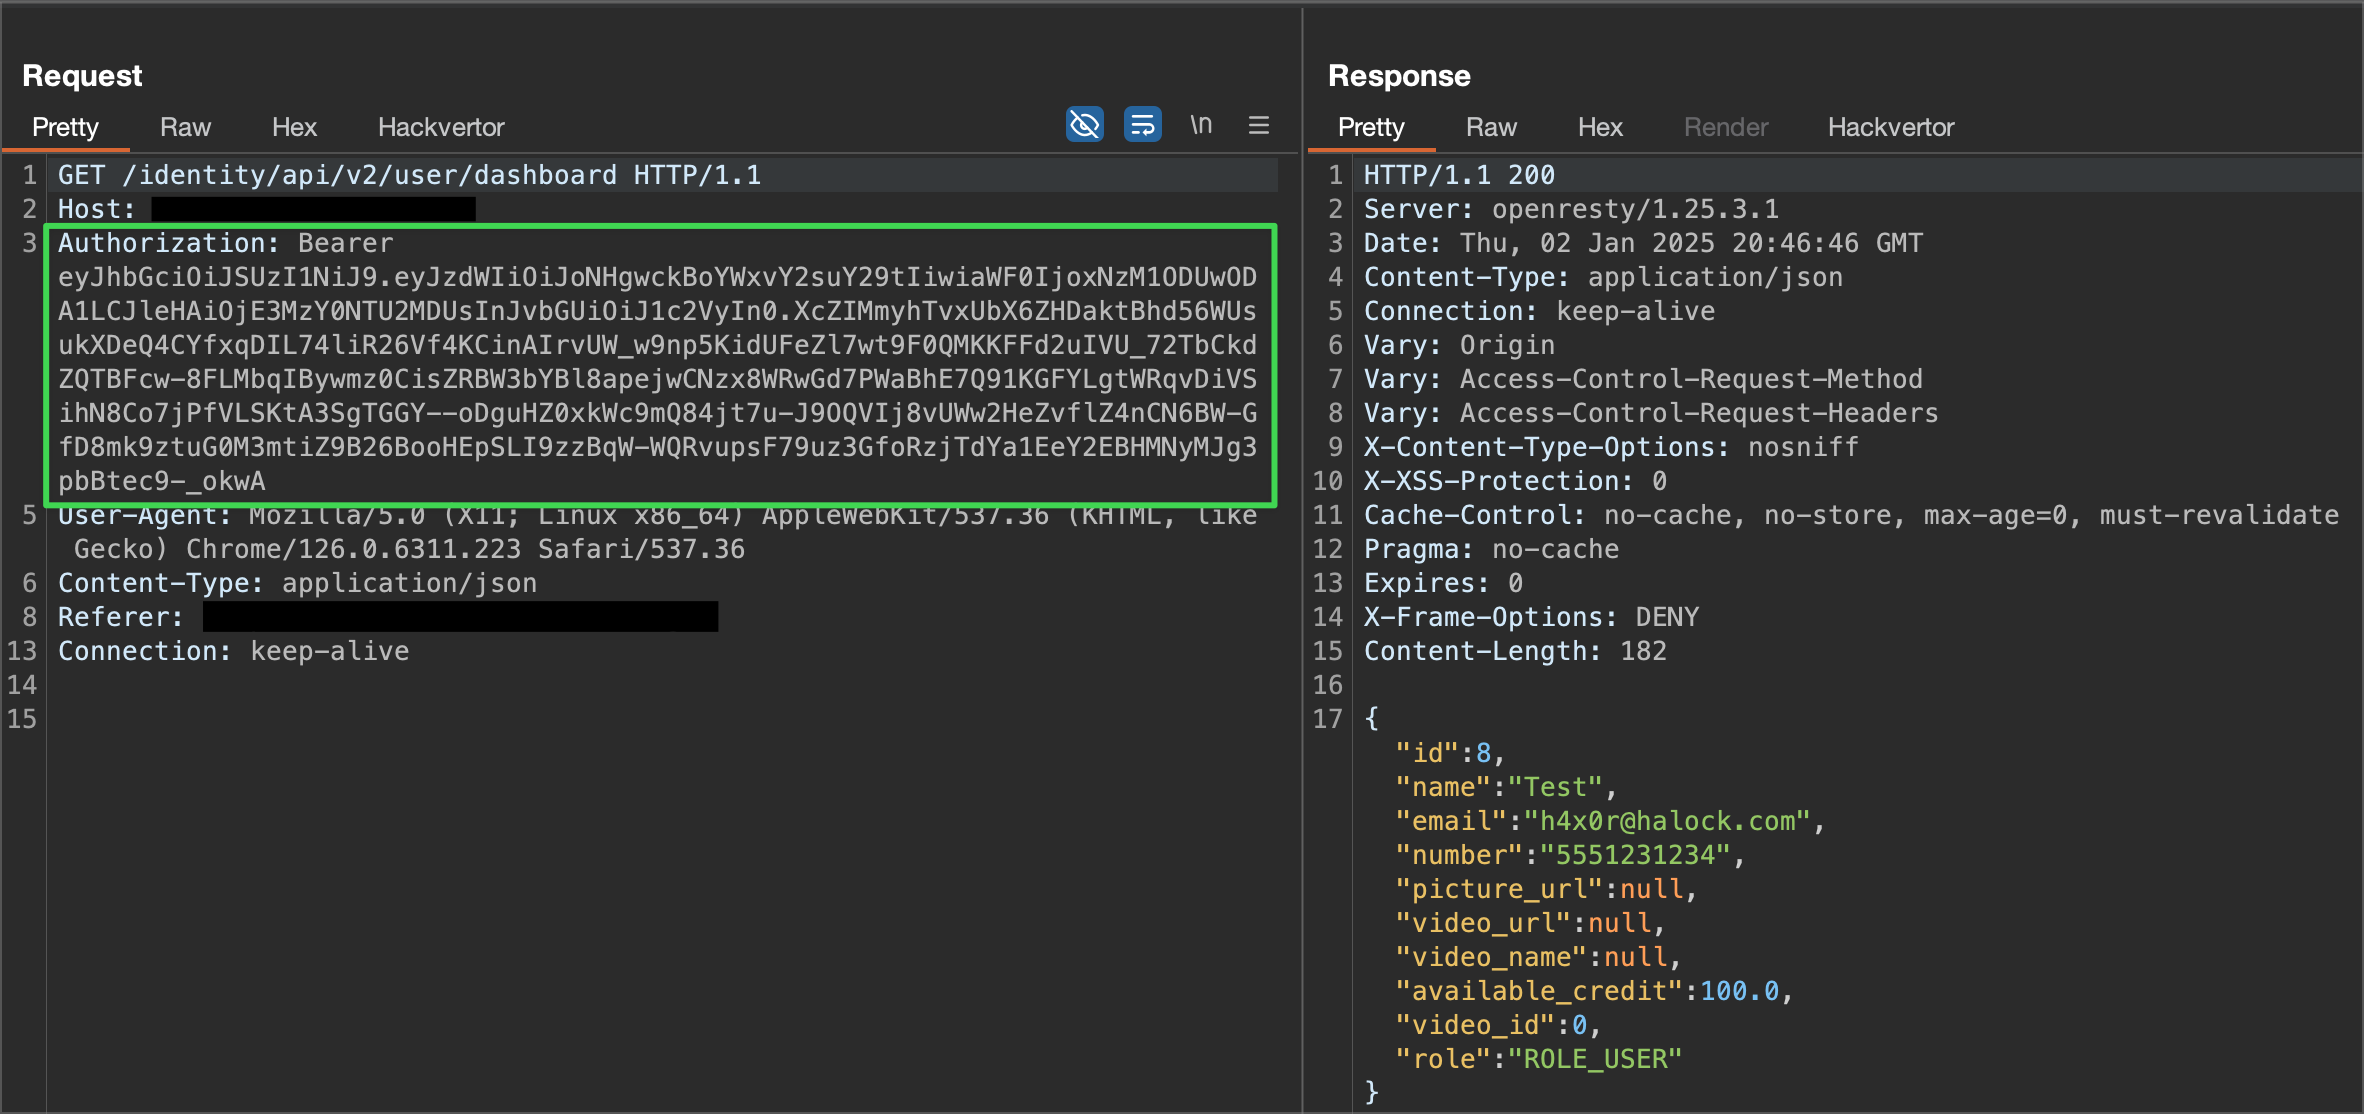
Figure: Authentication with JWT Token Returned
For the JWT example (I’ve heard these pronounced as “Jay Double-U Tee” and “Jawt”), the web user interface collects the username and password and submits them in a request to the API. The API credentials are validated, and the application responds with a “Token” whose value is a JWT, the long string of green text in quotes after the word “token.”

Figure: JWT Token Sent as “Authorization” Header
We are still discussing Authentication, but you’ll notice the token is included as an “Authorization” header in subsequent requests to the application. This is an example of how Authentication and Authorization can get confusing because the token here is used for Authentication, similar to the session cookie shown earlier, yet is named “Authorization.”
Authorization: Defining Permissions
Authorization occurs after authentication and determines whether an authenticated user has the necessary permissions to perform a specific action, such as retrieving or modifying data.
For example, consider a user who is logged into an application and attempts to update their email address. The system must ensure that the user is authorized to make this change to their profile. If the user is attempting to modify their own profile, authorization is typically granted. However, if the user is attempting to modify someone else’s profile, authorization is denied.
Authorization can become more complex when users are assigned different roles with varying levels of access within an application.
Let’s consider an example of an organization with multiple business units:
- User A may only have access to data in BU1.
- User B may need access to both BU1 and BU3 but not BU2.
- An Admin User in BU1 would have full access to all data within that unit but not in the others.
- A Company-Wide Admin would have access to all data across all business units.
As the number of roles increases, the authorization model must adapt to ensure each user only has access to the data and actions they are permitted to.
Common Pitfalls in Access Control
While implementing authentication and authorization, several common mistakes often lead to security vulnerabilities:
Failure to Check Authorization and Authentication for Every Request: One recurring issue is when an application fails to verify authorization and authentication for each request. For instance, an administrator might access an endpoint that lists all users, and the application correctly performs access control checks. However, if the administrator subsequently selects a specific user from the list, the system may only check authentication and not authorization. An attacker who gains access to the URL of a specific user’s data can bypass the access control and retrieve unauthorized information.
- Example scenario: An administrator accesses the endpoint “/admin/listusers” to view all users, and this endpoint correctly performs access control checks. However, when the administrator selects a user, the endpoint uses the user’s ID in the URL (e.g., “/user/10001”). While the endpoint checks for authentication, it does not verify authorization. An authenticated attacker can directly access “/user/10001” and retrieve data for that user, even if they are unauthorized. The attacker can then try other user ID numbers to gather data on different users.
Relying on Obscurity: Some applications assume that unique identifiers, such as UUIDs (Universally Unique Identifiers), will protect sensitive data. For example, an application may replace user IDs with UUIDs and assume that attackers will not be able to guess them. However, UUIDs can be exposed in logs, browser history, or other places, making it easy for an attacker to gain unauthorized access to the data.
- Example scenario: In an application, the “/admin/listusers” endpoint is properly secured, but when an administrator selects a user, the system redirects to a URL containing a UUID, like “/user/eeea680a-f258-4505-959a-ffc9d50f8f63”. The endpoint, however, doesn’t verify authentication or authorization at this stage, assuming attackers won’t discover the UUID. But UUIDs can leak through various means, such as being shared by users or exposed in logs like browser history or web server logs. If an attacker obtains this information, they can directly access the corresponding user data.
Inadequate Role Definitions: Another common mistake is defining too few roles to account for the complexity of an application’s user base. For instance, an application might define only two roles: user and administrator. However, in more complex scenarios, multiple roles might be required, such as specific roles for different business units (e.g., BU1 user, BU1 administrator, Company-Wide Admin). As the application grows, new roles will likely need to be created, and if this process is not properly managed, it may lead to shortcuts or oversights that introduce vulnerabilities.
- Example Scenario: In a more complex application, roles like BU1 user, BU2 user, BU3 user, BU1 administrator, BU2 administrator, BU3 administrator, and Company-wide administrator might be needed. A user may be assigned one or more of these roles, depending on their responsibilities. As the application grows, managing these roles becomes more complex, and shortcuts—like hardcoding rules based on IP addresses—may be introduced. This can be problematic, as it may expose the application to unauthorized users if the process for determining a user’s IP address is flawed or easily manipulated.
Misleading Trust in Headers: Some applications mistakenly trust certain headers, such as X-Forwarded-For, which can indicate the user’s IP address. For example, the application might assume that any request from the local server’s IP address is legitimate and grant full access. However, attackers can manipulate headers, causing the application to grant unauthorized access based on false assumptions.
- Example Scenario: Consider a request that includes the header “X-Forwarded-For: 127.0.0.1,” indicating that the request is coming from the local server. The application might assume that requests from the local server are legitimate and grant full access. However, attackers can forge this header in their requests, and if intermediary devices do not remove or validate it, the application may mistakenly believe the request is from a local user, granting access to an attacker located far away.
Let’s Summarize
Authentication
- Process of verifying the identity of a user or client
- Must be a secure process to validate users’ identity
- Authentication tokens should expire after a reasonable amount of user inactivity
- Authentication tokens should be revoked when a user logs out of the application
Authorization
- Process of verifying a user or client is permitted to perform an action
- Authorization schema must include the necessary roles while working to avoid unnecessary complexity
- Avoid hard-coding rules that bypass proper authorization checks
Paul – Web Application and API Testing